Compact production chain layouts for most common products that need to be made indefinitely.
Contents
Description
- Generally going to cover things that need to be produced infinitely so the layout can be set up, fed the inputs and have outputs with minimal fuss.
- Can be repeated over and over to scale up.
- Will likely add alternative layouts that use rare resources (i.e. FireIce cuts out a lot from Solar Sail and Purple Research).
- Layouts will generally use the most basic resources as inputs, or commonly used parts which are recommended to be manufactured en-masse on different planets and shipped over due to landmass constraints. Pretty much antithesis of requiring a main bus, but still can be integrated into one.
DSP Grid Shenanigans
Since the game exists on a square-ish grid mapped to spherical surfaces, the grid is mostly square but exhibits ‘grid crush’ closer to the poles.
Many buildings have two different bounding boxes in practice- how closely you can squeeze buildings together, and how close you can place belts.
- Smelters occupy a 3×3 grid, and you can place belts around them in a 5×5 square.
- Assemblers are ‘larger’ in that they occupy a 3×3 grid and you can place belts around them in a 5×5 square, but the closest you can place adjacent Assemblers are 4 tiles apart. You can also place power poles in this space.
Regarding grid crush vs layouts:
- The ‘grid crush’ effect affects these bounding boxes and in common cases anywhere but the equator, you e.g. cannot place north-south running belts in that mandatory gap between Assemblers.
- The vertical axis generally does not suffer from grid crush- sorters will always be able to reach 3 tiles away running north-south.
- These layouts therefore are best placed closer to the equator. I made it so most sorters straddle vertically, so orienting the top of the image to North or South works best to guarantee sorters can reach the things they need to reach
- Therefore, since most sorters are aligned this way, it’s generally not necessary to build as compact on the east-west dimension. Just space things out a little more if affected by grid crush
Red & Yellow Research
Default / No Rares Layout
1:1 correlation to match research requirements.
Note on Red Research:
The feedback loop for Hydrogen is cool, but virtually useless in the game right now. When starting Red Research, the game needs more Hydrogen than Refined Oil which makes the loop appealing, but this lasts about a few hours at most and then the game swings over to needing far more Refined Oil than Hydrogen for Yellow Research, Sulfur etc.
By the time it swings around to needing Hydrogen again late-game you can have a couple dozen Gas Giant orbiters for a virtually infinite supply as fast as you can use it up.
It does have its use at absolute endgame, but hilariously enough it’s for getting an infinite supply of Energized Graphite after Coal runs out.
Purple Research
See Particle Broadband + Processor layouts. 1/s Purple = 10 labs, with 2/s Processors and 1/s Particle Broadband feeding them.
Green Research
See Plane Filter and Graviton.
1/s Green Research is 12 labs supplied by 1/2s Graviton, and 3 Quantum Chip Assemblers being fed 1/s Processor and 1/s Plane Filter.
Solar Sails
4/s is plenty to get a swarm going. If you have enough guns to shoot them all into space it should result in ~6k active sails in the swarm, going up to ~10k and beyond as research extends their lifespan.
Sails eat a planet’s stone supply very very fast.
Refined Oil + Hydrogen
As Crude Oil is an infinite resource but a finite rate (which is clearly shown on the map display*) one of the most useful mid-game tasks is to tap every single node and siphon the oil to a single location, whether a massive processing plant or a main bus or a belt running completely around the world. Since there’s only one thing Crude Oil can be processed into, that gives an understanding on the upper cap for Refined Oil the planet yields, which also then translates into how much Sulfur, Organic Crystals (and eventually Graphite, if/when Coal has completely run out) combined, which then helps plan what can be produced at the same time from all the major branches off Organic Crystals (Titanium Crystals) and Sulfur (Titanium Alloy, Graphene).
*My understanding is Vein Utilization does affects the rate for Oil, unsure if direct +10% stacking addition per level.
Extensible setup based on belt speed.
Electromagnetic Turbine
Turbines are used in a lot of medium and lategame recipes as a part and thus make for a good candidate for manufacturing en-masse on a different planet. Pick one with lots of iron ore.
Processor
Large-scale processor manufacturing meant to be made on a planet with lots of silicon for exporting elsewhere.
Re: Titanium Alloy
Replied regarding queries in comments, thought I’d placeholder in the guide itself so it doesn’t get lost when comments scroll.
Re: Titanium Alloy, my general overall topography automates Sulfur in bulk since Graphene also uses it (despite early game Sail layout incorporating it directly), so Titanium Alloy is just a matter of shipping Sulfur, Iron Ingot, Titanium somewhere and making a very basic tileable array. This is after Logistics is automated so this can be plopped down anywhere.
I’ll probably get to raw mats -> alloy at some point with correct ratios, just not so soon while I work on other things.
In the meantime this is what I’m doing if it helps.
Fractionator
Full credit goes to Zanthra for this layout. Used with permission.
Tileable both horizontally and vertically, with each unit processing roughly 2.4/s Hydrogen into Deuterium with mk3 belts. One space of padding is needed when tiling vertically to fit the Tesla Towers.
Turning Hydrogen into Deuterium into Deuteron Fuel Rods is a good way to scale power early-mid game.
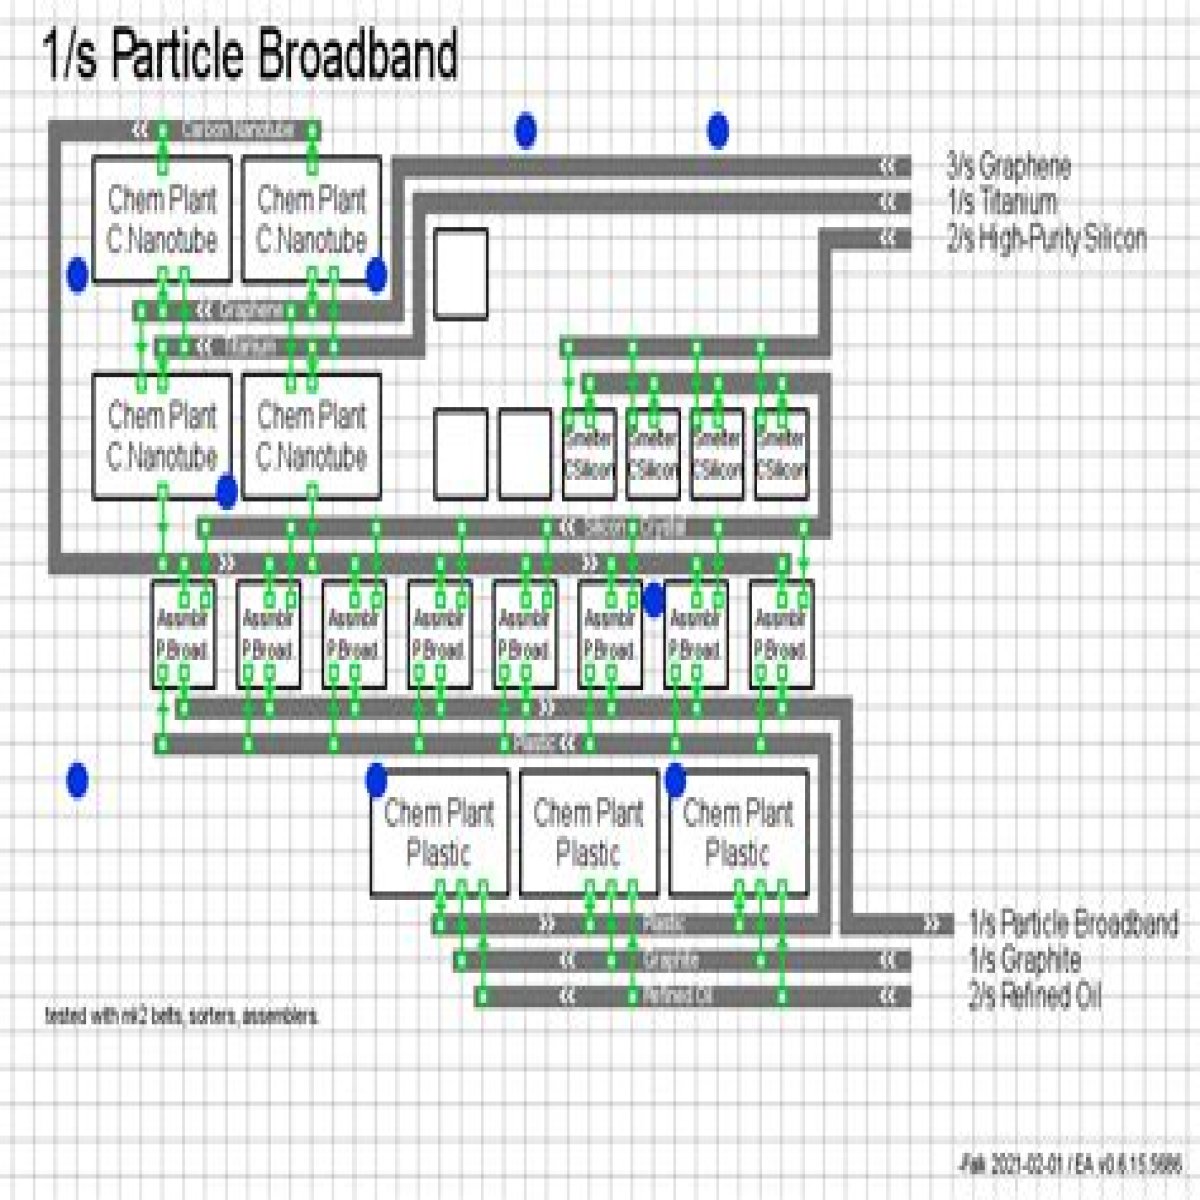
Particle Broadband
Particle Broadband is a bit of a weird bottleneck since automating some makes mk3 assembler production much easier, but at the same time the large number of Assemblers can also make use of mk3’s higher production rate.
Hence, this layout comes in two stages. An early 1/s layout with very specific spacing.
Followed by a direct upgrade (leave space on the left) to 3/s layout.
Cyan = mk3 assemblers.
The reason the plastic exits downwards and loops around is that with mk3 assemblers, for a good part of the belt each Plastic Chem Plant is making 0.333/s but ends up trying to feed two mk3 assemblers that use 0.375/s combined, eventually underfeeding them while uselessly backing up plastic production towards the left of the row. Having them all exit onto a belt before hitting the first Assembler rectifies that.
Plane Filter
Tileable with 1 extra column for the Titanium Glass belt bridge per 1/s Plane Filter. Cyan = mk3 assemblers, otherwise mk2.
Hopefully this helps to make the ridiculous number of assemblers neater.
Graviton
This is probably way too much power draw when first teching into Green research.
Remember 1/s Green only requires half as much Graviton, which is half of this layout.
Frame Material
I hate splitters. I hate having to carry yet another stack of ♥ around. I hate that they’re bulky. I hate that this layout uses it in the most inelegant fashion but if it works, it works.
I’m pretty sure there’s a better way to do this, but for the sake of filling in the gap in absence of anything better, here’s the layout I went with for scaling up.
1/s Frame Material is essentially equivalent to 1/6s Rocket, for quick calculations.
Small Carrier Rocket
Gonna take a moment to appreciate we’re now mass-launching rockets into space to build a megastructure that literally drains the sun and yet still using mk1 power poles.
Probably best to scale up slowly with this one. See also: Frame Material and Plane Filter.
Also if it helps any, what I did was assign a big open area to be my rocket building area, divided by the equator (where my railguns also are).
The four main sections represent quads and extend outward as much as power and incoming supplies can handle, with more stuff coming in through the supply line north and south and topped up by offworldlogistics (processors, turbines, etc).
(If you’re wondering why my Plane Filter tiles right to left, this is actually why, lol- the rocket quadrant tiles “left to right” because it’s flipped upside down with “up on the diagram” pointing south since it’s on the other side of the equator).
This is a relatively bad location (blocked by ore and some other stuff lol) but I built here off my frame material layout experiment location to illustrate.
The spaghetti in the center can probably be cleaned up a lot but it works so I don’t feel the need to touch it for this run.
Mall
I generally only group buildings together for the mall. Parts/products do exist in storage boxes but are generally all over the map closer to where they might be needed, which admittedly is probably a bad idea vs having it onhand to quickly grab stuff for handcraft newer buildings.
Here are layouts for the stages of the mall I use, showing roughly how much empty space to leave for e.g. the Motor Assembler that feeds into mk2 sorters.
As with Factorio, it’s a very good idea to keep the inputs for these completely separate from other production lines. As tempting it may be to e.g. pull the ends of the lines here to start making more parts, it usually ends up a bottleneck or other problem. Just set up more miners/etc to make new additional lines for indefinite manufacturing.
The inputs generally consist of parts that want to have been automated en-masse by that point. Putting down a Logistic station requesting them keeps things neat (hence the groups of 3). In terms of input throughput “A full belt” should be good enough for the lower-tier parts. It probably is worth upgrading the mall with mk2 belts, mk2 sorters and mk2 assemblers when they become available.
As with Factorio, good idea to limit the storages to a few stacks so the Mall isn’t constantly burning parts/energy which is impractical to use all at once anyway.
Starter Mall
Automated buildings:
- Belt mk1
- Sorter mk1
- Assembler mk1
- Smelter
- Matrix Lab
- Storage mk1
- Tesla Tower
- Miner
The input belts are grouped by (iron + copper), (iron), (stone) as sources to make it easier to plan where the input parts are being made as early game belt availability is a bottleneck. Additionally, Magnetic Coil and Circuits being grouped on the outside makes it convenient to pull for Research temporarily before setting up a more permanent Blue production line.
Early-Game Mall
Automated building additions:
- Oil Extractor
- Oil Refinery
- Chemical Plant
I somehow missed water pump- will probably go back and add it later.
Mid-Game Mall
Automated building additions:
- EM-Rail Ejector
- Wireless Transmission Tower
- Belts mk2
- Belts mk3
- Sorter mk2
- Sorter mk3
- Assembler mk2
- (Assembler mk3 honestly is a much later addition but shown earlier here just so the belting makes a little more sense)
From this point automation is up to what gets used most often. Good candidates are
- Accumulator
- Planetary Logistics Station->Interstellar Logistics Station->Orbital Collector (probably don’t need storage box for this, the stack in the assembler is enough)
- Both Drone types
- Ray Receiver
- Satellite Substation (I personally feel this is too expensive to spam all over the map until very stable Dyson rocket + White cube production)
General Build Order
These are my own notes- was asked by a couple folks to post it but I don’t plan to really maintain it like the layouts themselves lol. How suitable they are depends on your own playstyle. I generally do not main-bus except for oil and oil products as a little concession to hydrogen management and disposal.
Hopefully they help SOME folks though!
- Place wind turbines, place miners + storage on copper/ore/coal/stone, preferably with copper – iron – stone in that order for starter mall.
- Place assemblers to make magnet, circuit, gear, glass, stone, also temporarily place storage.
- Build starter mall, set up blue research, set up coal gen.
- Tech to red, setup mall for oil extractor/refinery/chem plant.
- Tap oil, send oil to equator bus, pick a spot for oil refining (see tileable layout), turn all combined crude oil that’s tapped to fuel/hydrogen, burn excess in thermal gens for now (this should be power positive to tap more and more crude oil nodes in range).
- Setup red research using yellow+red early game layout (ignore the yellow part) while also teching to yellow.
- Research drive 2, finish yellow+red layout, tech universe exploration to see what minerals the other planets have.
- Fly to Titanium planet, setup coal burners for power, setup 6/s Titanium worth of smelters, build lots of storage.
- Fly to Silicon planet, setup coal burners, setup 6/s High Purity Silicon, build lots of storage (if one planet has two it’s OK to just do both on one for now).
- Hand carry Titanium back, dump into Yellow+Red setup, beeline Interstellar Logistics.
- Setup automated transport for Titanium then Silicon in that order.
- Expand Red+Yellow to 2 per sec.
- Designate sites on other planet for mass-production of Turbines (copper+ore planet) and Processors (silicon planet, pref. with copper/ore).
Logistics
Plan on interplanetary mass production and shipping of:
- Copper Ingot
- Iron Ingot
- Magnet
- Graphite
- High Purity Silicon (first)
- Titanium (first)
- Glass
- Stone
- Electromagnetic Turbine (first)
- Processor (first)
- Other than (first) label, not completely necessary until home planet starts running out.
- Tech to deuterium fract and fusion plant.
- Automate graphene and sulfur, dump into equator bus (should have oil, fuel, graphene, sulfur now).
- Hydrogen “exhaust” all gets belted towards the pole and makes a circular belt about 70 degrees towards pole.
- Handcraft enough mk3 belts to run 10 fracts for 3/s deuterium, run fract line near hydrogen belt.
- Target orbital collector, set up a couple before hydrogen in tank runs out to dump into fusion plant.
- Setup titanium alloy automation.
- Ship titanium alloy, magnet, turbine, graphite to hydrogen belt, automate fusion power cell x2, setup fract line near hydrogen tank, ship deuterium, build 20 fusion plants. 180Mw should be plenty for now
- Setup organic crystal automation, send this to equator main bus (should have oil, fuel, graphene, sulfur, organic crystal).
- Setup mid-game mall.
- Setup automation for logistics + drones (will be placing a lot of these).
- With abundant logistics, possibly rethink planet layout, remove unnecessary belts, drones will carry almost everything. Overall topography is still important as travel time is a factor along with power draw
- Setup 4/s sails and enough guns to shoot a decent amount of them. 3K swarm is good enough to start with. Catch up on all available sail lifetime/receiver efficiency to boost power. Guns on equator, receivers on poles equally spread is rarely wrong
- Once swarm starts, put 6 receivers (3 per pole) on the other two planets, setup 6/s processor and 6/s turbine to ship.
- Tech to purple, setup particle broadband automation, make 2/s purple.
- Tech to green, setup planar filter and graviton automation, make 2/s green.
- Tech to dyson sphere, setup frame material automation, design sphere and start launching some rockets.
- Start seeing what rares nearby systems have.
- Calculate maximum throughput of home planet’s oil products. Crude oil rate (viewable on map) = sulfur + organic crystals, which limits graphene vs titanium alloy vs solar sail rate, discounting rare ore, figure out good tech rate
- Start transitioning to artificial sun/antimatter power as dyson sphere completes past 500mw or so.
